
Photographs taken 2017
See also Adele's
Modifications and
Modifications 2
pages (there are a goodly many!),
or go back to the
Adele main page,
or Adele 2021 as
she was when we sold her.
The Want and the Design
Or should that be a wanton design?!!... well we like it! It was
all down to the fact that I had always wanted a more traditional
looking wooden mast on Adele than the original stainless steel one.
The metal one I presume, was one of the various versions that seem
to have been supplied by Hardy over the years, but with a
traditional rope fender and the good sea-going look of a Hardy
Family Pilot, I have always thought that a small wooden mast would
be in character and keeping with such a boat. This was further
compounded by the fact that we had a slightly unusual inherited
navigation light setup on our mast, by way of the steaming light
being "back-to-back" with the sternlight, thus imitating an
all-round white light/anchor light (for a boat less than 12m), which
although odd, still remained technically acceptable. This I wanted
to change to a more acceptable single all-round LED steaming/anchor
light.
However, small wooden boat navigation masts can often be
seen on older boats, but initial searching on the internet found
nothing that was easily available as a standard chandlery item. Some
are available given a bit of digging, but none really managed to fit
the bill or the size wanted. The subsequent way forward was that I
chose to design my own mast, to my own custom dimensions, and make
it using my own vaguely competent carpentry skills, as illustrated
by the "before and after" photos below. Hopefully these instructions
and photos will enable anyone else to follow the same design, should
you also be interested in making your own mast.
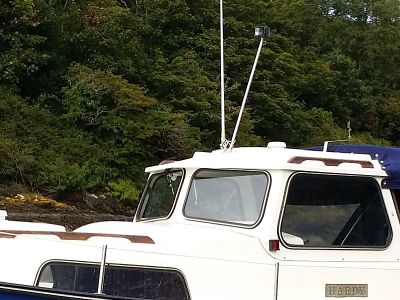
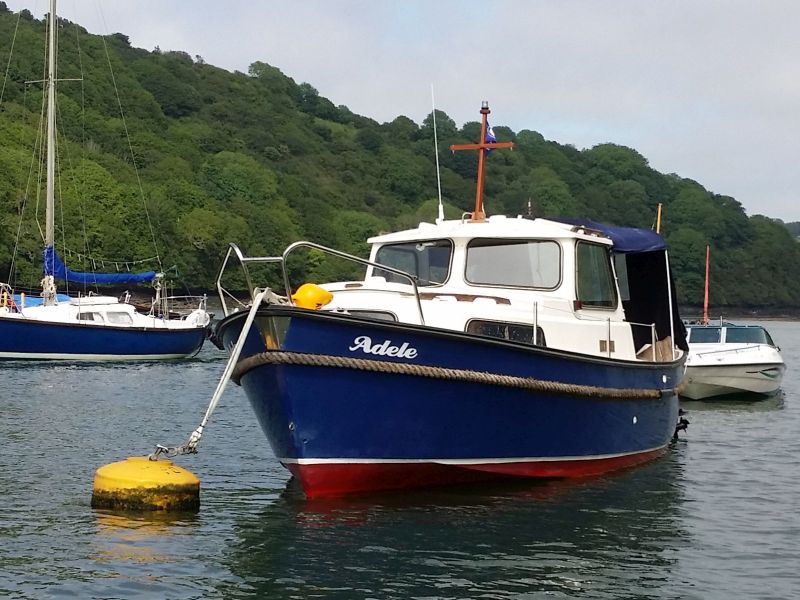
Adele's original stainless steel mast "before"
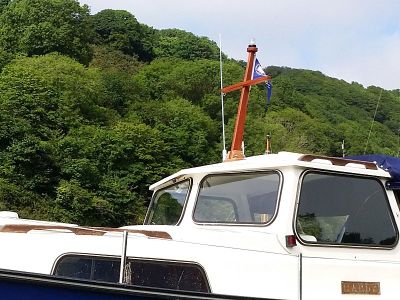
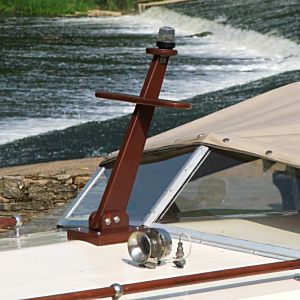
...and Adele with her new wooden mast "after"
The research I did do, eventually turned up a few options, but the cost or sizes available did not meet requirements. As examples, those masts from Sheridan Marine (£240 including a stainless steel base) and Sealee Boat Masts are good examples (as shown below), and the latter are perhaps the most cost effective and versatile chandlery options for anyone not wanting to make one from scratch (coming in at £49 to £160 depending on size, wood or ply, and other options).
The Freeman 22 mast (left) from
Sheridan Marine, and examples (centre & right) from
Sealee
Boat Masts
So to the design! This began as a good sensible design drawing of the primary dimensions, but ended up as more of a working build drawing as the job progressed, and gaining a few decent working stains along the way! However, the essence of the job remains with the drawing, and I can only reproduce the end result here - it will have to suffice for any copies to be made! To download a pdf copy, just click on the drawing image.
The rake of the mast was designed to match the rake of the wheelhouse windscreen (15°), and a specific requirement was for the cable or wires for the navigation light to be fed directly up through the centre of the mast. This small point was the crux of the matter however, as how to do it was far from apparent in looking at the photos of any chandlery version. I finally settled on a "split" mast section - or at least, a mast and "cover" piece - with a routed channel in the main section. On further inspection of chandlery versions, I suspect this is how most commercial examples are produced, and without some exceptional drills and jigs, there ain't no way you're going to simply just drill a hole up the middle!
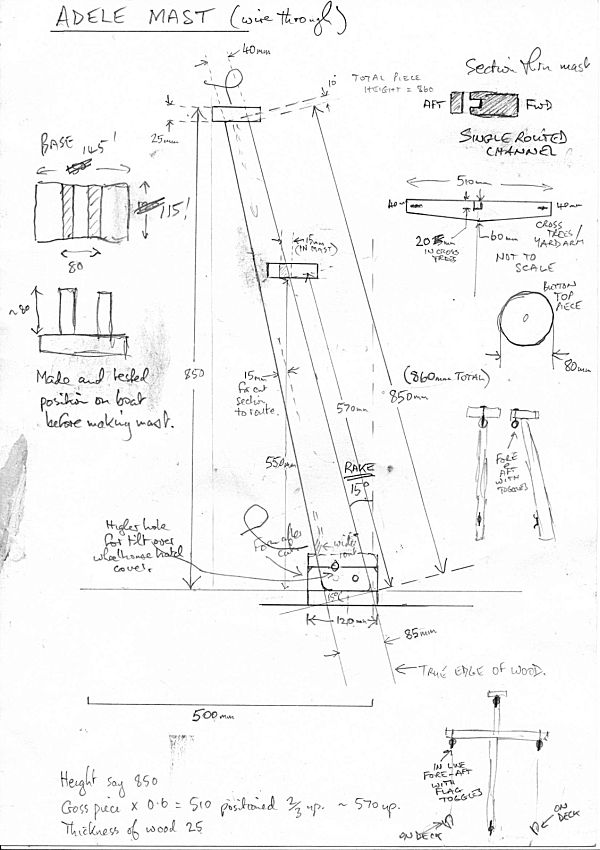
The new navigation mast design - more of a working drawing!
(click on drawing to download a pdf copy)
For the wood, I used a plank of mahogany that I had left from a previous project, though any decent hardwood would do, especially iroko - another good boat building timber for such items. The thickness used was 25mm which seemed aesthetically right, and the height of the mast was chosen to be 850mm, similar in height to the existing stainless steel version. The crosstrees - or cross-piece - was designed to be 2/3 up the mast, with a width of 0.6 x height.
The Build
Start with the big bit. This was carefully cut with a jigsaw and guides, as far as possible along the grain parallel to the leading mast edge. Take care the blade is strong enough not to take on an angle from the vertical as the cut progresses, and the initial blade angle is set and tightened correctly. Top (button) and bottom (base) faces of the mast need to be measured and cut correctly, remembering the 15 degree rake! The finished item will look a little odd otherwise!

First cut the mast upright section
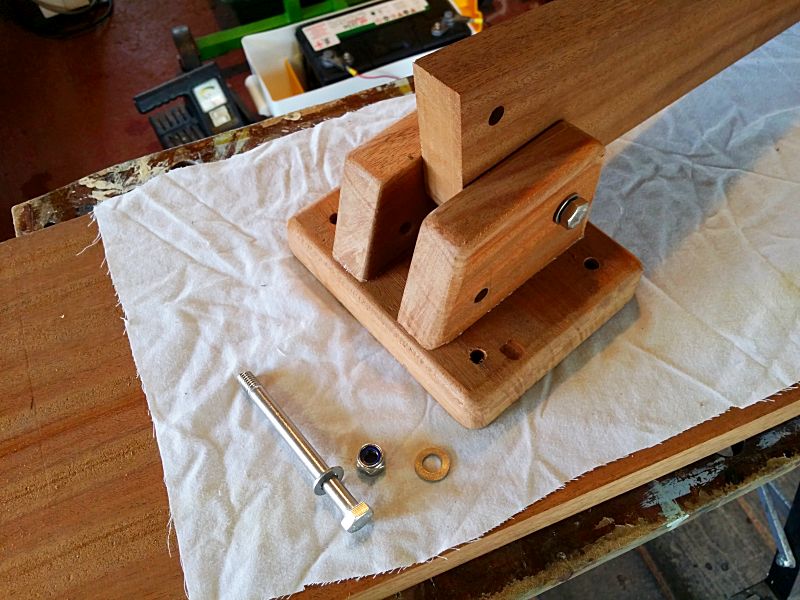
Before progressing any further, it is well to make the base piece that will be bolted to the wheelhouse deck, and will mount and support the mast. This can then be trial placed in your chosen position on the boat, and the position of the mast bolt holes measured in base and mast stem, to enable successful tilting of the mast, if such facility is required. In making this base piece, a good snug fit is needed for the mast within the base (not tight but very little gap), and this can be achieved by careful jigging of the base parts and mast itself, while gluing and screwing the base sides to the base bottom. The leading faces of the base sides were also raked at an angle of 15 degrees, and were drilled and securely screwed on with decent length screws from underneath - make sure the screws do not come up through where the mast bolt holes are planned!
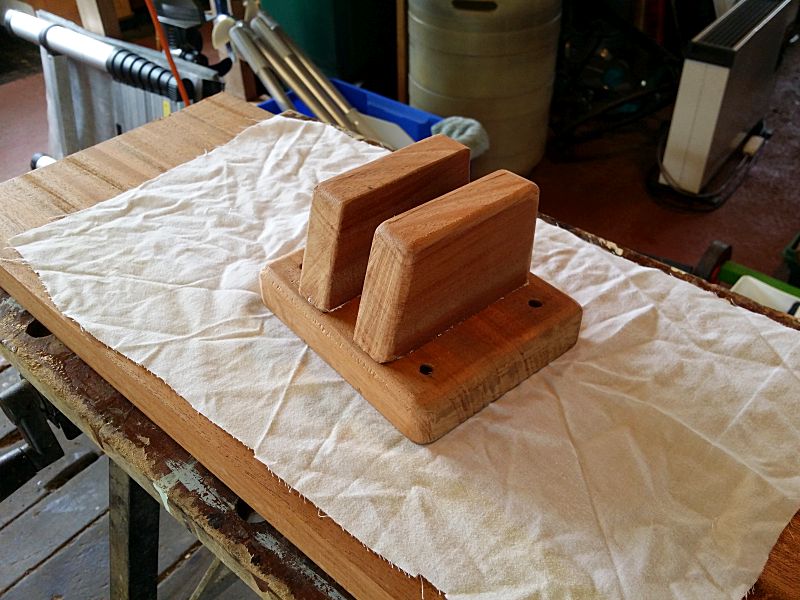
The base piece
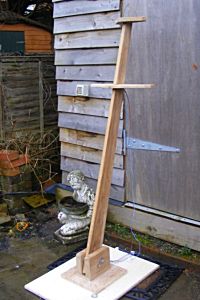
The finished base piece and mast upright prior to trial boat positioning and measuring of mast bolt holes looks like this, and now is the time to check that all is headed in the right direction, and the job looks as you want it to look on the boat...
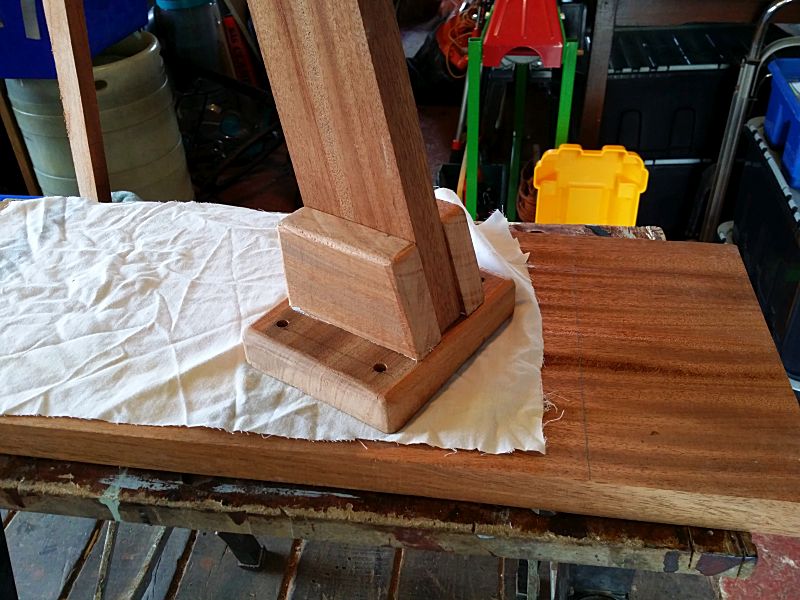
Ensure a snug but not tight fit!
The mast bolt holes can then be drilled. Using a bench press/pillar drill to drill directly through the whole assembly in one shot is the best method, as this will ensure that the alignment is correct between all parts and all the drilled holes. Drill through into another solid piece of wood to ensure that you do not end up with breakout around the bottom of the hole, spoiling the look. The completed assembly should look something like this...
Mast and base drilled for stepping
And now we come to the scary bit! One mistake and you will be making a new mast stem all over again! Now is the time to cut down the length of the rear face of the mast to cut away the eventual cover for the navigation light cable/wire routed channel. This is where very careful and firm jigging of the jigsaw and cut-line is needed. I achieved this by using a heavy metal rule to guide the jigsaw along the cut-line, while keeping a firm pressure on the saw, but without forcing it forward too quickly, and just letting the saw itself do its work. Care and patience is required, and you may need to move the jigsaw guide and mast along as I did, in order to cut along the whole mast length.
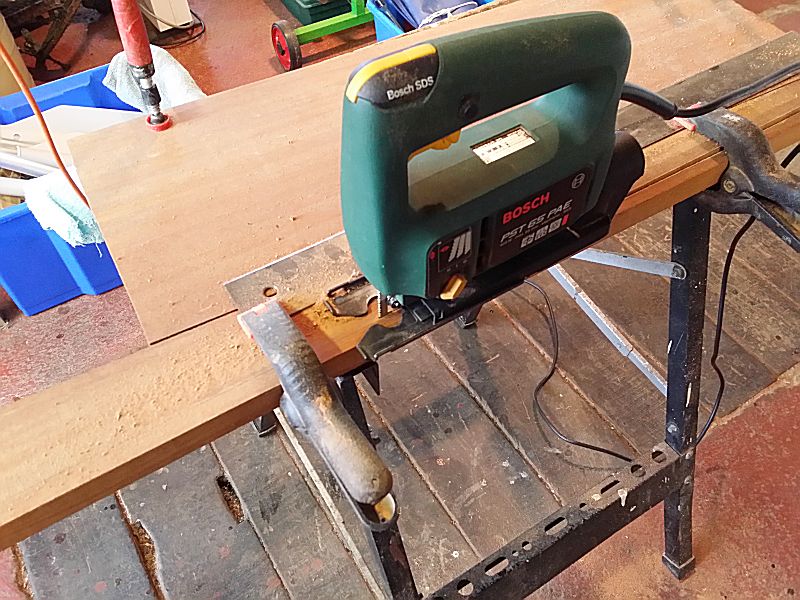
The scary bit - cutting the cover for the cable run
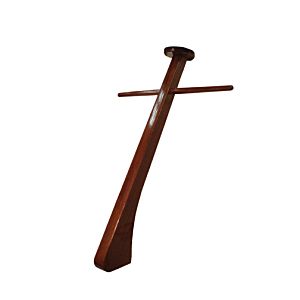
The end result, with a bit of trimming at the bottom end for the
cable exit, should look something like this...
(One tip, if you
are leaving the job for any amount of time at this stage, it is a
good idea to clamp the cover piece to the mast in its correct
position, to avoid any inadvertent warping of the thinner cover
piece).
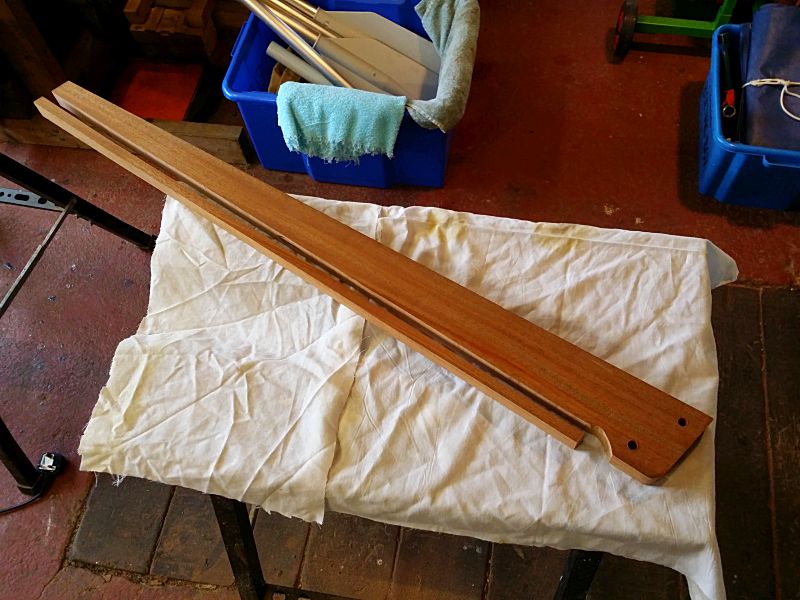
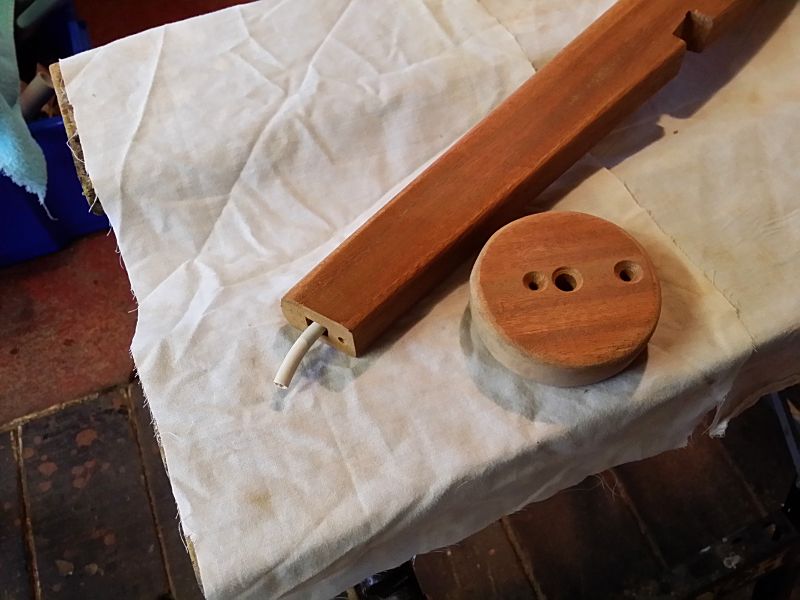
Cable cover cut away, and the mast cable exit cut and shaped
(the
rear of the bottom of the mast has also been rounded to enable mast
tilt)
You are now well on the way, and all that remains for getting the wire up through the centre of the mast, is to rout out the wire/cable channel in the main section of the mast. Use a routing bit of a size suitable for accommodating the wires or cable that you are using. I used a length of 13A 3-core mains cable, largely because it was robust, clean and white, and it was available! For this, I used an 8mm routing bit, set to a depth of 8-9mm, giving a slightly over-square section once the job was done. If it is any consolation to the uninitiated in the arts of routing, this was my first real routing job, using an inexpensive basic router, so it can't be all that impossible to do. The important thing to remember is to set up the job with ample support to one side for the router to run forward on. I used a spare piece of mahogany plank built up to the same height, and all supported and clamped to the bench, such that the router guide plate ran easily along the side of the mast, at the correctly set depth. Let the router do its work, and do not force it along. Try it on a piece of scrap wood first!
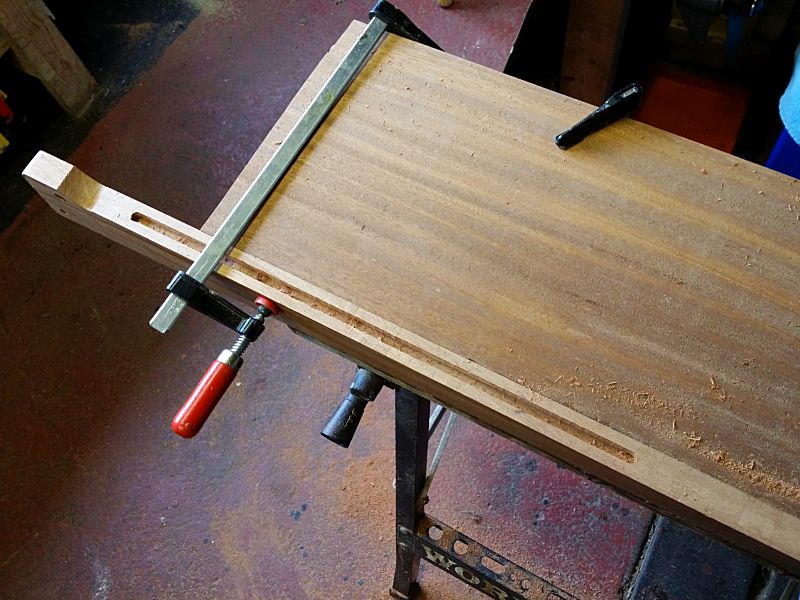
Routing the channel for the light cable
If all goes well, you should end up with a mast section that looks vaguely like the one below, with the rout extending into the cable exit area, and the cover (the previously cut-off piece!) all ready for re-fixing back onto the mast, thus very neatly hiding the cable channel inside the completed mast. Now is the time that you can also start to feel good about the job!

Channel for cable completed and cover ready to glue
Placing the cover strip temporarily on the mast section, you can start to see how it will all work, and how the cable will exit towards the horizontal, and how it is worth using a cut-off strip of the main section of the mast, instead of using a completely separate unmatched piece of wood for the cover. This will preserve the visual look of the grain pattern in the mast as a whole. Before gluing this cover back on though, there is one last job to do.
Close-up of cable exit prior to gluing
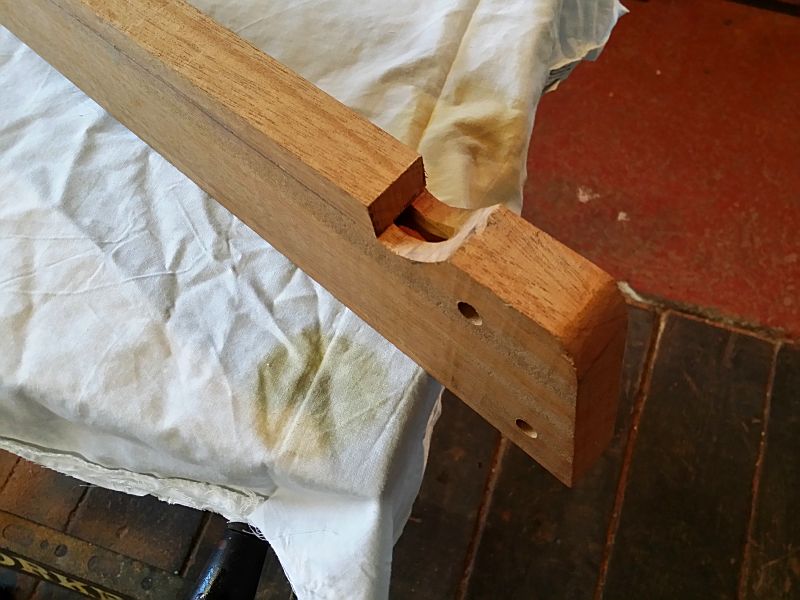
It is not absolutely necessary to do the next bit before gluing and assembling the cable cover, but I prefer to finish all the wood cutting before putting things back together, and it is easier without a cable flapping around. The cut-out slot is for the joint to accommodate the fitting of the mast cross-piece or crosstrees, which can also be made at this time, from a similar piece of wood or plank to the one that the mast came from. Dimensions are as given in the design drawing, and the joint should be cut and chiselled to a tidy snug fit with no unsightly gaps.
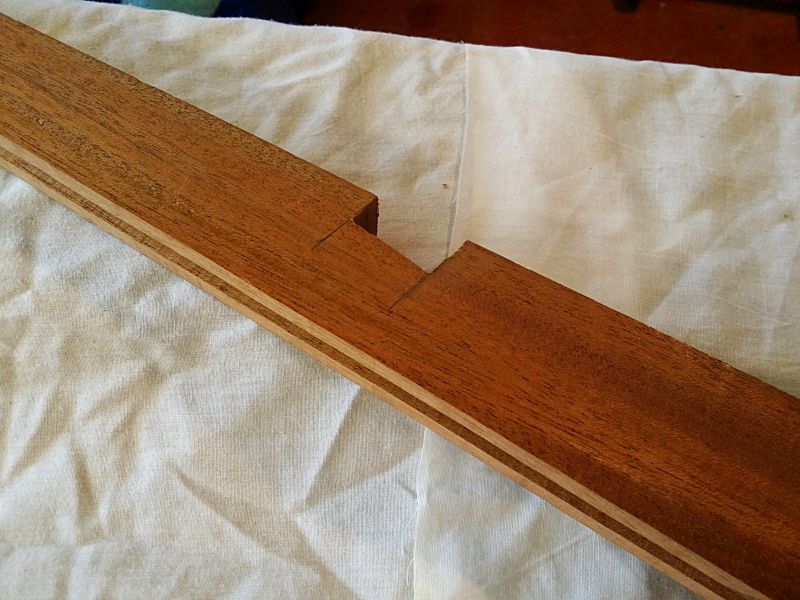
Cut the joint for the crosstrees (really just a cross-piece!)
With the mast and cross-piece made, it is time to glue the cover over the cable channel back into place. Use a good wood glue - not the contact adhesive stuff - and as a good tip, lay the wires or cable in place before gluing. Imagine the frustration when trying to feed the cable up through the mast after gluing, just to find an inadvertent wood burr or glue obstruction stopping the cable from getting through! Clamp it well.
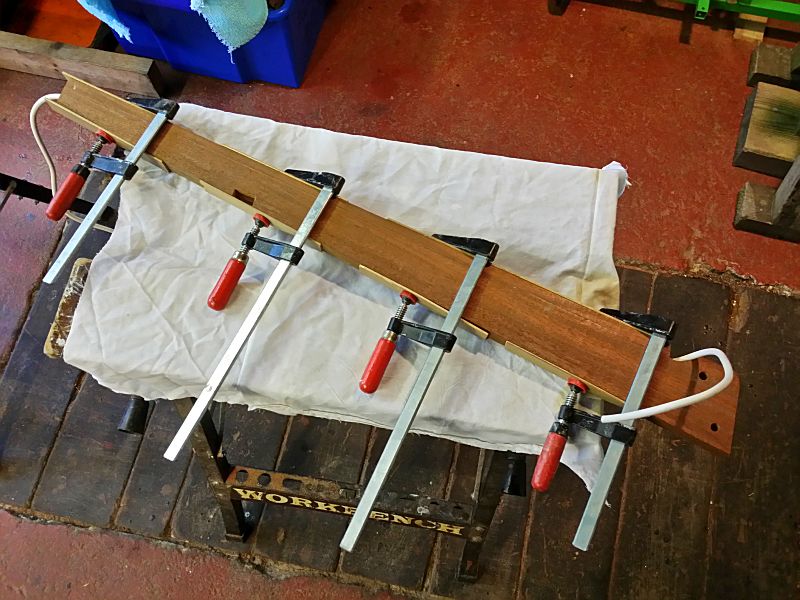
Gluing the cable channel cover - always best to insert cable first!
Once the glue is completely set, the two pieces of the mast can be fully sanded and finished. The edges are planed and sanded, and the corners are rounded. With a good finish, the seam between the main mast section and the cable cover disappears into insignificance, with the perfectly matching grain of the wood hiding any evidence. Holes have also been drilled in the ends of the cross-piece for eyes for flag halyards.
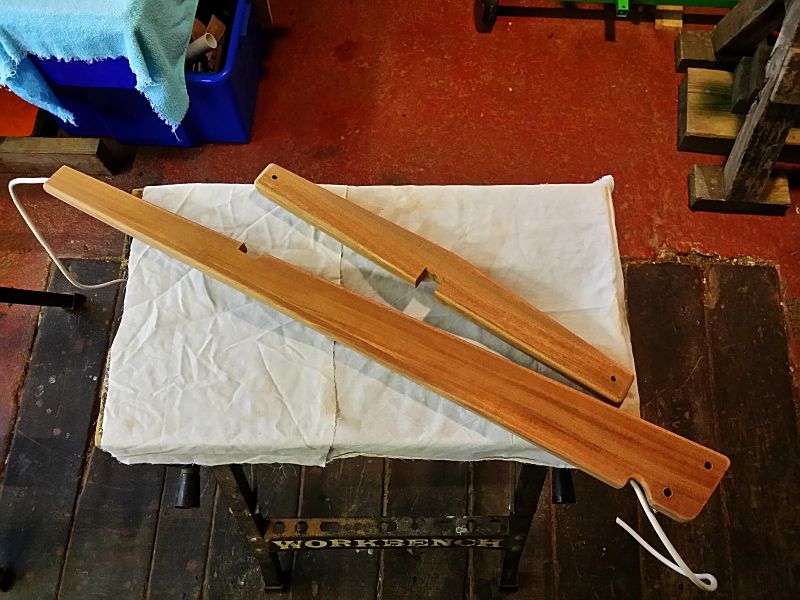
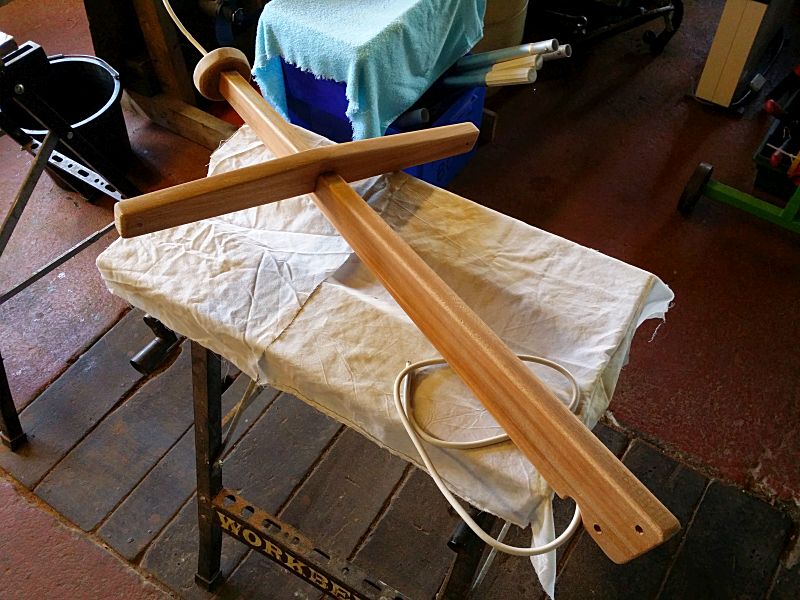
Mast and Cross-piece ready to glue in place
At this stage it is also the time to make the button for the top of the mast. A hole is also drilled for the central cable exit (countersunk to accommodate the light fitting rubber grommet as may be necessary), plus a hole for the main flag/burgee halyard eye (also countersunk for flush screw fit), and a smaller countersunk hole and matching pilot hole in the mast top, for the button screw fixing when it is glued in place. Round all edges, and prepare to assemble!
Mast Button ready to glue and screw
To assemble the three component parts, glue them together using a
good wood glue ("stronger than the wood itself", so the marketing
says!). I only glued the mast cross-piece in place on the mast
upright, to avoid any unsightly screw heads, but glued and screwed
the top button on as no wood joint is used. You now have a mast that
looks like a mast!
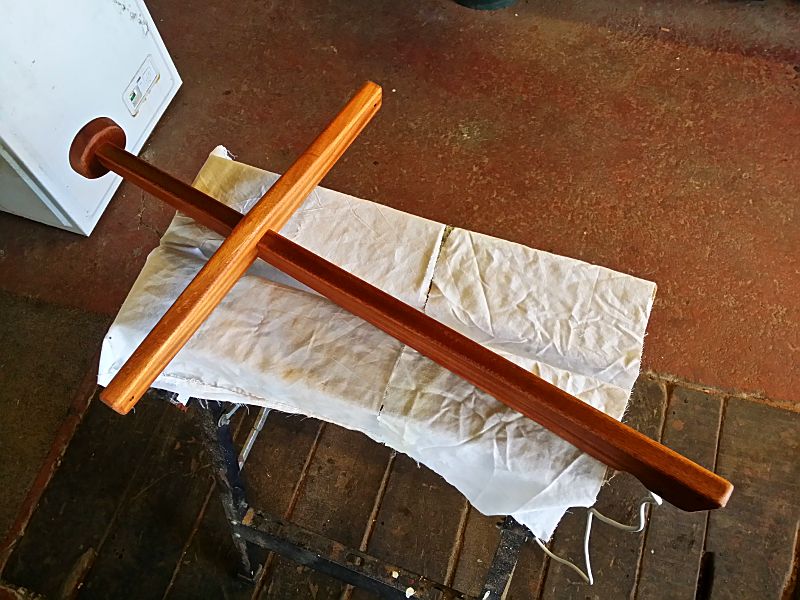
Mast assembled, glue set and ready to go!
Once all the glue is set and the mast tidied up, you can progress to treating the wood. I chose to use teak oil rubbed in with a cloth, rather than any varnish coating, as this matches the other hand-rail woodwork on Adele, and will not be subject to flaking in the future, should re-varnishing maintenance falter! I also happen to like the look, although you will find the colour fades to the regular "teak look". You will also find that many coatings of oil will be required initially, and repeated maintenance coatings will also be needed. The rubbing on of oil is also a sight easier than labourious brushing on of layers of varnish when the mast is in use. One point of caution however... teak oil when left on used and packed away rags has been known to result in spontaneous or self combustion - so do dispose of the rags safely, either by soaking them in water, or by burning them deliberately at home in the garden incinerator!
Several coats of teak oil later
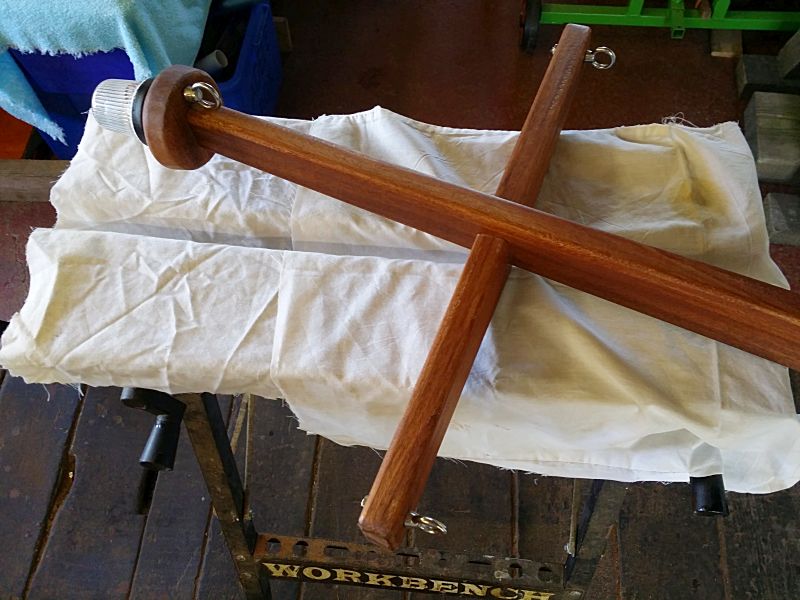
You are ready to go! Assemble the mast steaming/anchor light on the mast button (wire it first, then fix down the light base), and add any burgee and flag raising mast furniture. The connector for the cable deck connection will also need to be added - ensure you have adequate cable length, as now is not the time to cut the cable or wires too short!
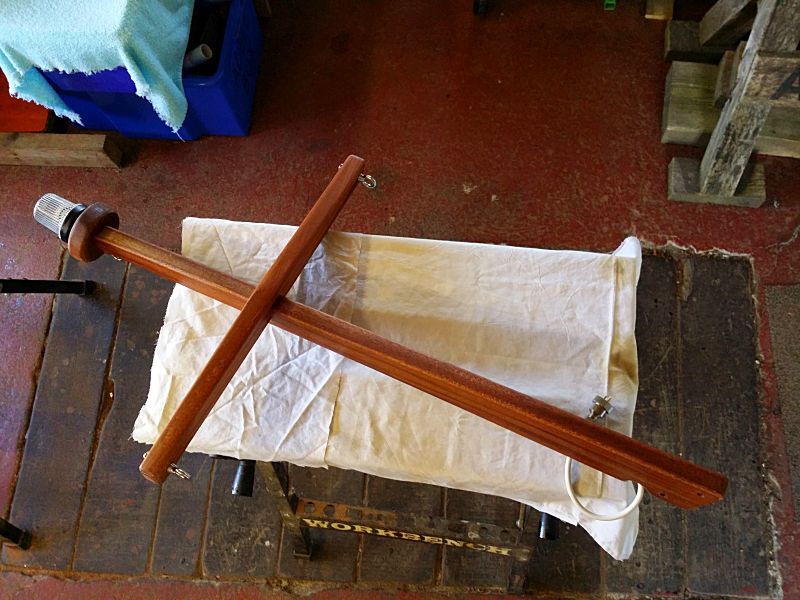
Navigation (steaming and anchor) light fitted, cable connector and
all mast fittings added
For illustration, a close up of the cable exit and burgee cleat on the rear of the mast is shown below. Make sure you do not use screws for the burgee cleat that screw through into the navigation light cable!
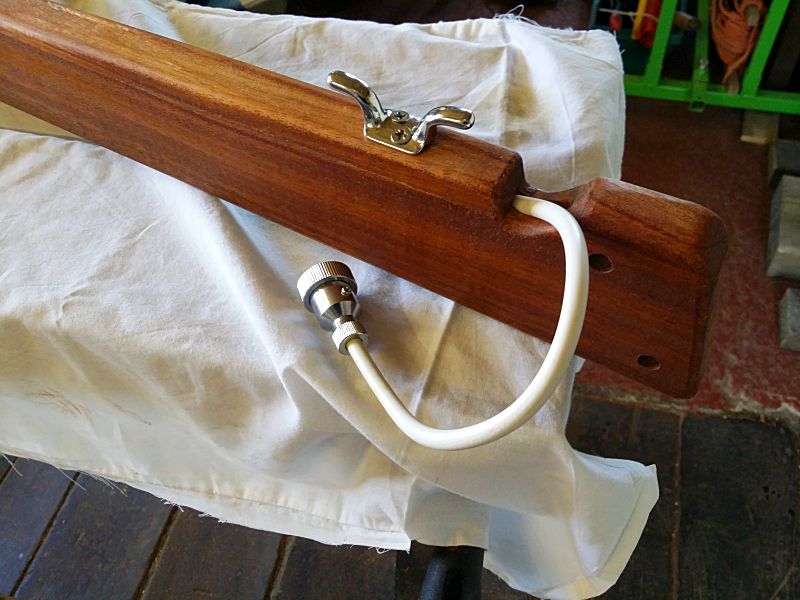
Burgee cleat and light connection
The burgee eye on the top button may need to be fitted before the navigation light base as the countersunk head lies partially underneath the light. The flag eyes on the crosstrees are also fitted now, completing all the fittings you will need.
Navigation light in place, plus top burgee and flag fittings
The Result
You may now raise your mast on the boat! We also fitted a new VHF aerial at this time, that is also lowerable and removable, thus making winter storage easier with boat tarps - another advantage with the new wooden mast!
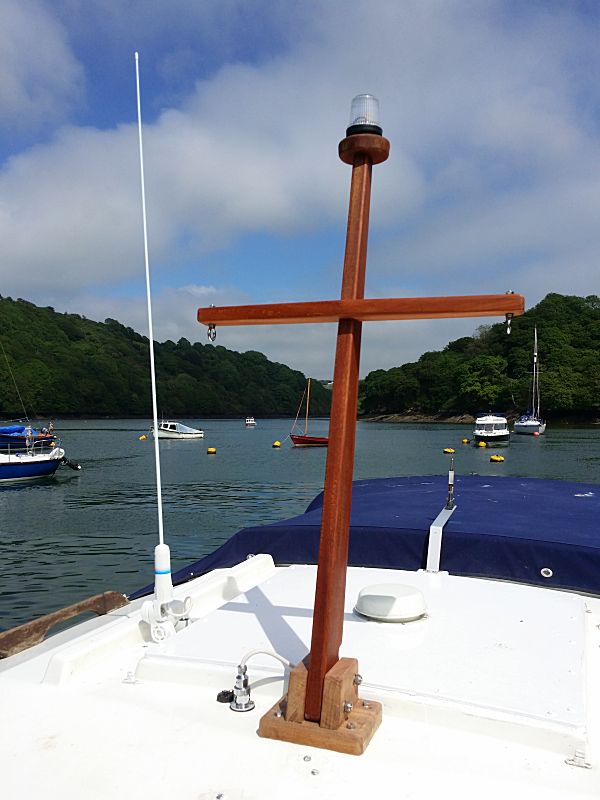
New mast aboard!
(and another coat or two of teak oil needed on
the base!)
The mast is able to be lowered flush with the top of the wheelhouse should this be required, though in the photo below, there is a screw in the wheelhouse hatch panel that meets the burgee cleat, that needs to be moved aside! If lowering the mast for bridges is required, a drop pin would of course be a better choice of fitting instead of the second mast bolt.
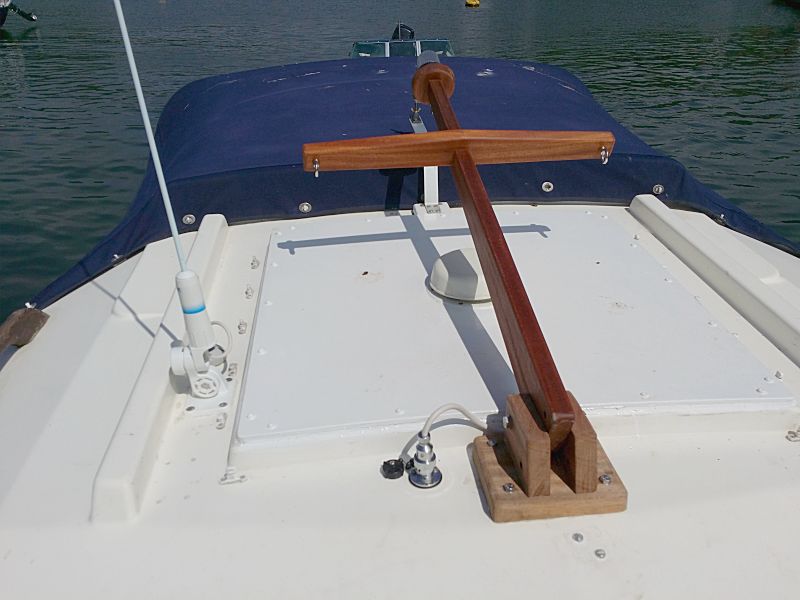
Designed to be lowered when and if necessary - or just bolted in the
raised position
(still awaiting deck eyes and cleats for the
crosstrees eyes)
Adele's proud new look...
Adele with new mast
...with the Hardy Owners Club burgee flying high!
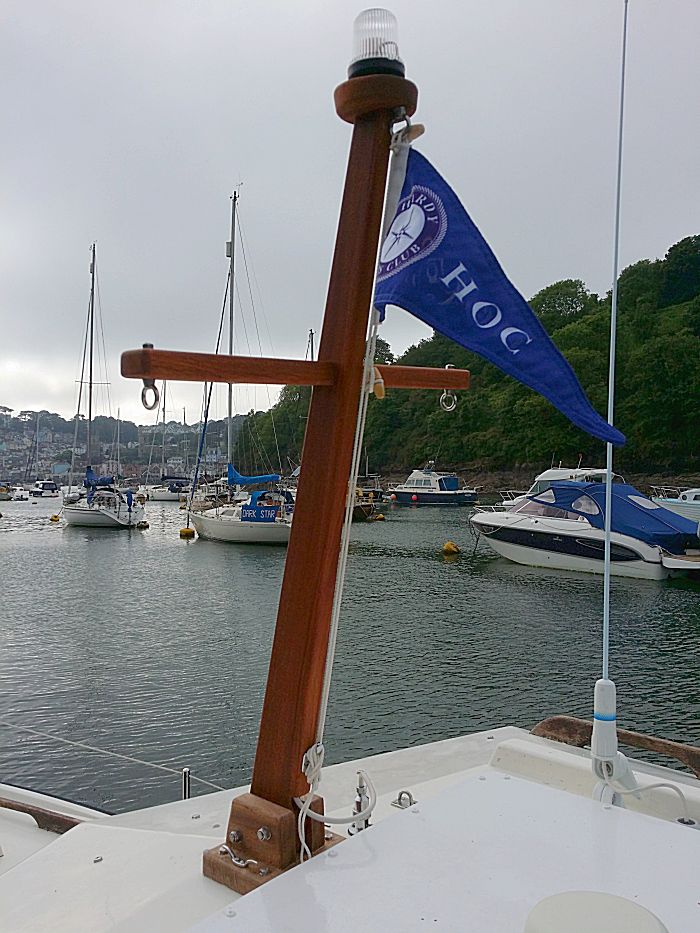
Adele's new mast with the HOC Burgee flying high!
For further details of modifications carried
out to Hardy Family Pilot Adele,
see
Modifications and
Modifications 2
pages (there have been a good many of them!),
or go back to the
Adele main page,
or Adele 2021 as
she was when we sold her.
See Adele out on the water on Motor Boating in Fowey
![]()
Connect with us, Like us and Follow us on Facebook!
PhotoFile Cornwall supports CoaST and Sustainable Tourism